Here’s a simple graph of the temperature at my desk at work over the last 24 hours. It’s using a temperature and humidity sensor hooked up to an old Arduino NG and sending data to a custom console application that uploads to Cosm.com.
<img src=https://api.cosm.com/v2/feeds/92748/datastreams/Temperature.png?width=748&height=250&colour=%23f15a24&duration=1day&legend=Temperature%20(%C2%B0C)&title=Temperature%20at%20My%20Desk&stroke_size=6&show_axis_labels=true&detailed_grid=true&scale=auto&timezone=UTC>
The sensor I’m using also measure humidity, so I’ve been logging that as well. Here is a graph of the same time period showing the humidity.
<img src=https://api.cosm.com/v2/feeds/92748/datastreams/Humidity.png?width=748&height=250&colour=%23f15a24&duration=1day&legend=Humidity%20(%25)&title=Humidity%20at%20My%20Desk&stroke_size=6&show_axis_labels=true&detailed_grid=true&scale=auto&timezone=UTC>
You might ask ‘What does this have to do with Revit?’ or ‘Why are you doing this?’ The answer is partly that I have a great interest in data, data visualization and the IoT. I also believe that part of the value in moving to systems, like Revit, that makes embedded data practically inevitable if not friendlier and more accessible, is that we can start to do some real, testable research. We can do simulations in software and then we can compare that to real data like what I’ve shown above.
It’s far from reliable at this point, but it’s a start.
UPDATE: Obviously the links above don’t work anymore and at this point, I’m not sure if I ever captured an image to replace the live link, but if I find one, I’ll add it in. For now, I just preserved the api call in a code block. ¯\_(ツ)_/¯
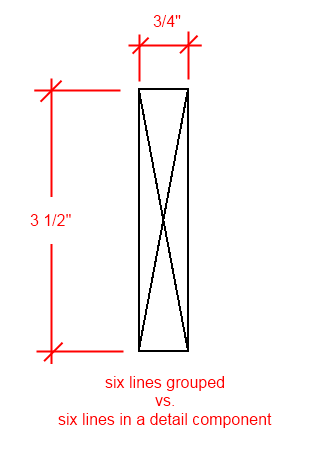
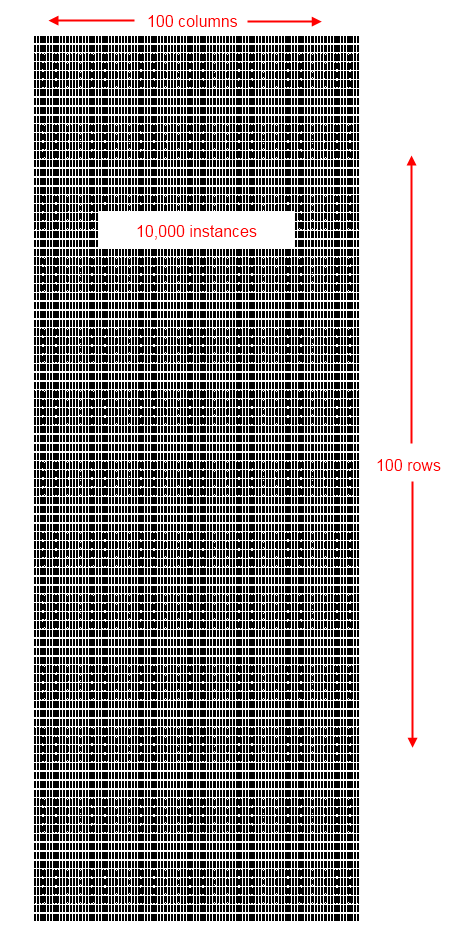
I’m sure this has been done before, but here’s a simple file size comparison for using detail components vs. using detail groups. I took a simple 1x4 and made a detail group out of this using six lines and arrayed it 100 times in one direction and arrayed the array 100 times in the other direction. You can see images of it below. I then took the out-of-the-box Revit detail component of a 1x4 and inserted that into a new file starting from the same template and arrayed it the same way. I then saved the files as new files (to compress them) and checked the file sizes. I did the same thing for one instance for both the detail component and the detail group.
The results are telling - the single instance files are exactly the same size, but the file with 10,000 instances of the detail group is more than twice the size of the corresponding file using detail components. Now, I admit, 10,000 instances is a lot of instances so I did the math and using the detail group ended up adding about 100 bytes per line. That could add up to something not too insignificant.

This video nicely documents the two methods of upgrading a model on Revit Server.
We’ve started rolling out Revit 2013 and among the new features is one called selection sets. There are already many different ways to aggregate objects in Revit which means it is often unclear which one to use. Regardless, I welcome the new addition - perhaps this one will work where all the others have come up short.
The topic of selection in Revit reminded me of a simple tip that, in my experience, is mostly unknown but beloved by those who do know it. The tip is that Ctrl + Left Arrow reselects the previous selection. If you have ever spent considerable effort control-selecting a large number of objects only to somehow accidentally deselected them, you can breathe a sigh of relief.
We’ve been looking into Revit Server for awhile at work, but never found the right project to use as a pilot until recently. There’s finally a project where our team is split between two different physical locations on the same WAN and Revit Server makes sense.
We have used GlobalScape WAFS in the past, quite successfully, when we needed access to a set of models from various locations not on the same WAN. This was before Revit Server even had that capability. That, however is a different blog post - forthcoming.
I’m sure I’ll write more about this as the project develops, but today I wanted to go over how to obtain a list of files from the Revit Server without using Revit.
I need to create local files of all the project (.rvt) files in a specified directory on the Revit Server. Autodesk provides a command line tool for making a local copy of a single file and this works well - we’ll need it - but it’s limited. First, you can only make one local file at a time. Our project has four files, but what about when there are 10 files? Or 50 files? Or 10 projects each with more that five files? We have projects like that, they just aren’t currently using Revit Server. The second limitation is that you must know the name of the model before making the local copy. Again, there are only four models and I know their names, but we’re going to do this anyway.
The command line local file creation utility does not provide an option for returning a list of models in a specific folder, so we’ll need to turn to the API. Revit Server uses the REST API. I’ll be using AutoHotKey in my example, but you can use any language. Jeremy Tammik has some helpful information with links to Autodesk’s documentation and examples. If you have the Revit SDK installed, you also have the Revit Server SDK which includes a PDF titled Revit Server REST API Reference which will be invaluable. On my machine, it can be found here:
C:\Program Files (x86)\Revit 2012 SDK\Revit Server SDK\Revit Server REST API Reference.pdf
We’ll need to make a specially formed HTTP request. This is a common task for web applications and consequently there are several libraries written in AutoHotKey that can do this - I’ve chosen to use HTTPRequest.ahk by VxE. Revit Server will respond to this request by sending back JSON formatted data. To get the filenames (or the project names in the future) we’ll need to parse the response. Again, JSON is common on the web and I easily located json.ahk by polyethene to help with this task. There are a couple of other scripts I gathered on the AutoHotKey Forums that I’ve linked to in the code. That’s about it. Once we are able to dynamically gather the file/project names, we can do something with them. My script below just shows the list of files in a message box and then writes it to a text file, but we could also call the Revit command line tool and loop through the project folder to make local/backup copies of every model without having to know the model names in advance.
So here’s the script.
;;
;; AutoHotkey_L Version:  1.x
;; Language:            English
;; Platform:            x64
;; Author:              Eric Stimmel
;;
;; Script Function:
;;	Query Revit Server and return a list of models from a specified folder.
;;

#NoEnv  ; Recommended for performance and compatibility with future AutoHotkey releases.
SendMode Input  ; Recommended for new scripts due to its superior speed and reliability.
SetWorkingDir %A_ScriptDir%  ; Ensures a consistent starting directory.
#SingleInstance force
#Persistent

; include the supporting scripts
#include HTTPRequest.ahk
#include json.ahk
#include autoByteFormat.ahk

; create a new GUID for the HTTP header
; http://www.autohotkey.com/community/viewtopic.php?t=84037
TypeLib := ComObjCreate("Scriptlet.TypeLib")
NewGUID := TypeLib.Guid
StringReplace, NewGUID, NewGUID, {,,All
StringReplace, NewGUID, NewGUID, },,All
; MsgBox %NewGUID% ; for debugging

; create the headers
; <host> is the name of your server
URL := "http://<host>/RevitServerAdminRESTService/AdminRESTService.svc/|My Revit Server Project/contents"
In_POST__Out_Data := ""
In_Out_HEADERS := % "User-Name: " . A_UserName . "`nUser-Machine-Name: " . A_ComputerName . "`nOperation-GUID: " . NewGUID
Options := "Method: GET"

; make the request
HTTPRequest(URL, In_POST__Out_Data, In_Out_HEADERS, Options)

; MsgBox % In_POST__Out_Data ; for debugging - this should show the request that is sent

; set up our while loop
increment = 0
name = Models[%increment%].Name
model = % json(In_POST__Out_Data, name)

While model
{
	size = Models[%increment%].ModelSize
	modelsize = % json(In_POST__Out_Data, size)
	modelsize := autoByteFormat(modelsize)
	modelList = %modelList%%model%`t%modelsize%`n
	increment++
	name = Models[%increment%].Name
	model = % json(In_POST__Out_Data, name)
}

; MsgBox %In_Out_HEADERS% ; for debugging - this should show what is returned (see below for a sample)
MsgBox %modelList% 									; show the list in a message box
FileAppend, %modelList%, C:\ModelList.txt 			; write the list to a text file

ExitApp
Here’s what the server returns. I’ve formatted it for ease of reading. You should be able to figure out what’s going on… If you uncomment the “In_POST__Out_Data” message box, you’ll get this unformatted in a message box. You can also write it to a text file for further analysis or just to see what you get.
{
	"Path":"My Revit Server Project",
	"DriveFreeSpace":204557041664,
	"DriveSpace":250056704000,
	"Folders":[],
	"LockState":0,
	"ModelLocksInProgress":null,
	"Models":[
		{
			"LockState":0,
			"ModelLocksInProgress":null,
			"ModelSize":12398749,
			"Name":"ARCH-1.rvt",
			"ProductVersion":2,
			"SupportSize":46843
		},
		{
			"LockState":0,
			"ModelLocksInProgress":null,
			"ModelSize":19581057,
			"Name":"STRUC-1.rvt",
			"ProductVersion":2,
			"SupportSize":7929
		},
		{
			"LockState":0,
			"ModelLocksInProgress":null,
			"ModelSize":7515290,
			"Name":"ARCH-2.rvt",
			"ProductVersion":2,
			"SupportSize":20218
		},
		{
			"LockState":0,
			"ModelLocksInProgress":null,
			"ModelSize":19395162,
			"Name":"STRUC-2.rvt",
			"ProductVersion":2,
			"SupportSize":5881
		}
	]
}